OX6:RHEL5 Cluster
Installation and Configuration RHEL cluster suite for an Open-Xchange Cluster
This document gives a rough description about how to set up and configure Redhat Cluster software including LVS as load balancer for Open-Xchange. The Document can be used as starting point for designing own clusters and is not meant as step by step howto.
LVS
Abstract
LVS is running in an active-passive configuration on two nodes. A “reduced” three-tier topology is used: the “real servers” are provided as virtual services by another two node RHEL cluster. The OX service will benefit from load balancing because it is running in active-active mode as two virtual services on the RHEL cluster and it is ensured that each virtual OX will run on one of the physical nodes of the cluster. The Mysql and Mail services are configured to each run on a single node and will failover in case of a node outage. LVS is using NAT as routing method and the round robin algorithm for scheduling. See the sketch for IPs and general configuration.
- LVS is configured on two nodes: node1111/192.168.109.105 and node2222/192.168.109.106
- A single “external” IP is configured for all services: 192.168.109.117
- The routing IP (used as gateway from the “internal” part of the setup) is configured as 192.168.109.116.
- The LVS heartbeat network is using the private network 10.10.10.0/24.
- Network devices are bundled together as bond devices to gain higher redundancy.
- Firewall marks are used to get session persistence.
Illustration 1: Setup of LVS and HA cluster
Installation
On both systems a RHEL 5.2 operating system has been installed. On top of the base installation the LVS-parts of the RHEL cluster suite has to be installed. Because the piranha web interface is used to ease the configuration tasks the package piranha-gui has to installed on the system 192.168.109.105 as well.
- All packet filters are disabled to avoid impacts on the cluster:
system-config-securitylevel disable
service iptables stop
chkconfig –del iptables
Check/edit the file /etc/sysconfig/system-config-securitylevel, the service must be set to disabled.
- Also selinux is disabled resp. set to permissive mode:
system-config-securitylevel disable
Check/edit the file /etc/selinux/config, the service must be set either to disabled or to permissive. If selinux was set to disabled and should be enabled again: set to permissive, boot, execute touch /.autorelabel, reboot, set to enabled.
- IP forwarding is enabled in /etc/sysctl.conf, set net.ip4.ip_forward=1
- Network zeroconf is disabled in /etc/sysconfig/network a line is added NOZEROCONF=yes
Configuration
Services
- On both systems the sshd and pulse services are enabled:
chkconfig –level 35 sshd|pulse on
- On the piranha system (192.168.109.105/node1111) the piranha web service is enabled:
chkconfig –level 35 piranha-gui on
- Also the apache web server is enabled and started:
chkconfig –add httpd
service httpd start
- The access to the apache server is allowed to anybody via /etc/sysconfig/ha/web/secure/.htaccess. This can be changed and adapted to the needs/policies in place.
Network
A single network 192.168.109.0/24 is used for all real and virtual IPs and the private network 10.10.10.0/24 for the LVS internal communication. Via bonding of two physical devices the network devices bond0/1 need to be configured for both networks during the base installation.
On node1111 the bond devices are configured as:
DEVICE=bond0
BOOTPROTO=none
BROADCAST=192.168.109.255
IPADDR=192.168.109.105
NETMASK=255.255.255.0
NETWORK=192.168.109.0
ONBOOT=yes
TYPE=Ethernet
...
DEVICE=bond1
BOOTPROTO=none
BROADCAST=10.10.10.255
IPADDR=10.10.10.3
NETMASK=255.255.255.0
NETWORK=10.10.10.0
ONBOOT=yes
TYPE=Ethernet
And on node2222 the bond devices are configured as:
DEVICE=bond0
BOOTPROTO=none
BROADCAST=192.168.109.255
IPADDR=192.168.109.106
NETMASK=255.255.255.0
NETWORK=192.168.109.0
ONBOOT=yes
TYPE=Ethernet
...
DEVICE=bond1
BOOTPROTO=none
BROADCAST=10.10.10.255
IPADDR=10.10.10.4
NETMASK=255.255.255.0
NETWORK=10.10.10.0
ONBOOT=yes
TYPE=Ethernet
Firewall Marks
Firewall marks together with a timing parameter are used by LVS to make considerations about packages from the same source and the same destination but different ports. Marked packages are assumed to belong to the same sessions if they bear the same mark and appear during a configurable time frame. The following marking rules are configured:
Mark sessions to port 80/http, 443/https and 44335/oxtender with “80”:
iptables -t mangle -A PREROUTING -p tcp -d 192.168.109.117/32 --dport 80 -j MARK --set-mark 80
iptables -t mangle -A PREROUTING -p tcp -d 192.168.109.117/32 –dport 443 -j MARK --set-mark 80
iptables -t mangle -A PREROUTING -p tcp -d 192.168.109.117/32 --dport 44335 -j MARK --set-mark 80
Mark sessions to port 143/imap and port 993/imaps with “143”:
iptables -t mangle -A PREROUTING -p tcp -d 192.168.109.117/32 --dport 143 -j MARK --set-mark 143
iptables -t mangle -A PREROUTING -p tcp -d 192.168.109.117/32 --dport 993 -j MARK --set-mark 143
The rules are saved and the enabled via:
service iptables save
chkconfig –add iptables
After the configuration the file/etc/sysconfig/iptables should contain a paragraph with the following rules:
...
-A PREROUTING -d 192.168.109.117 -p tcp -m tcp --dport 80 -j MARK --set-mark 0x50
-A PREROUTING -d 192.168.109.117 -p tcp -m tcp --dport 443 -j MARK --set-mark 0x50
-A PREROUTING -d 192.168.109.117 -p tcp -m tcp --dport 143 -j MARK --set-mark 0x8f
-A PREROUTING -d 192.168.109.117 -p tcp -m tcp --dport 993 -j MARK --set-mark 0x8f
-A PREROUTING -d 192.168.109.117 -p udp -m udp --dport 44335 -j MARK --set-mark 0x50
...
Configure LVS
To ease the configuration of LVS the RHEL piranha-gui is used.
- A password for the piranha-gui needs to be set:
piranha-passwd
- The piranha-gui is started:
service piranha-gui start
The gui can be accessed at the URL: http://192.168.109.105:3636/. It should be considered to limit access to the piranha GUI.
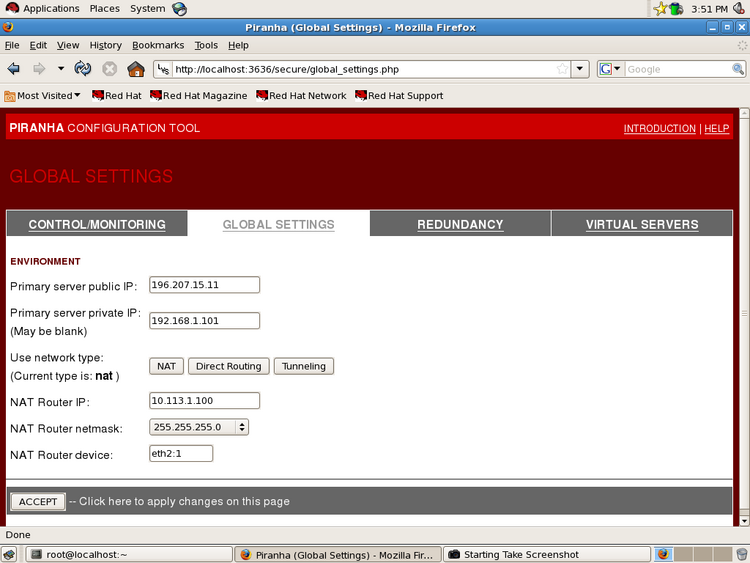
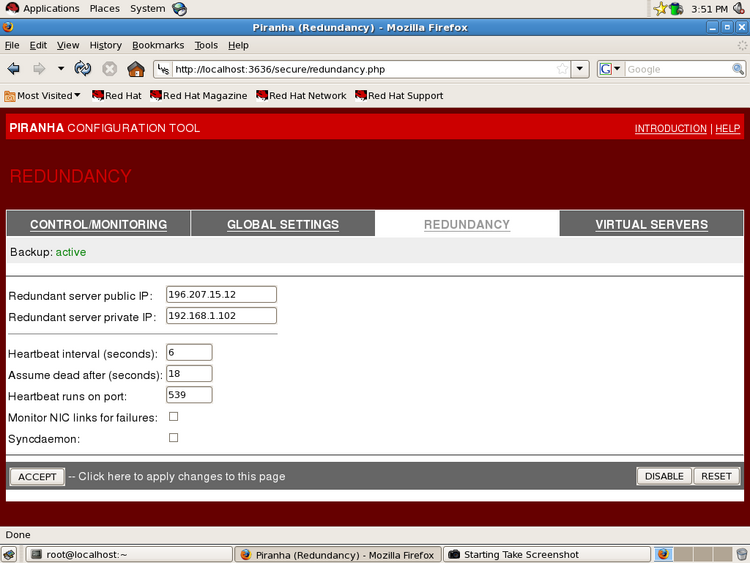
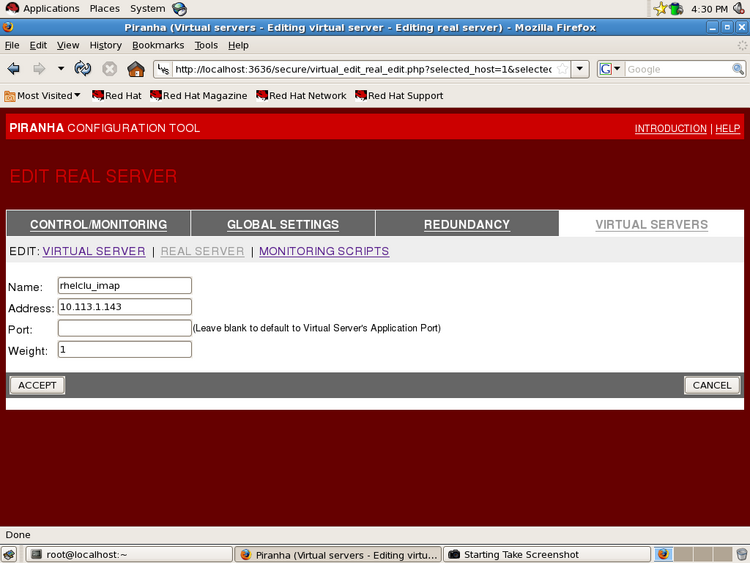
The following screenshots are showing configuration examples:
Illustration 2: Setting of primary IP and address routing/NAT
Illustration 3: Setting of secondary IP and heartbeat configuration
Illustration 4: Defining a virtual servers
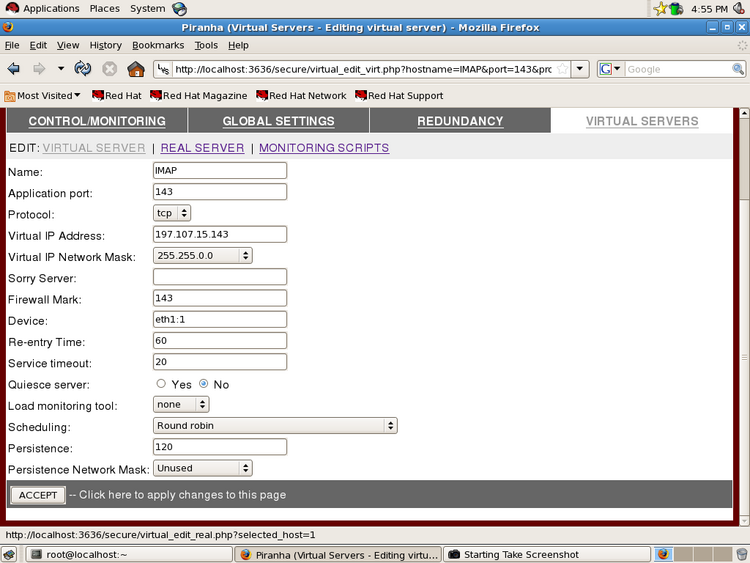
Illustration 5: Specify details: IP, port, virtual network device, firewall mark/persistence and scheduling algorithm for a virtual server (example: imap/143)
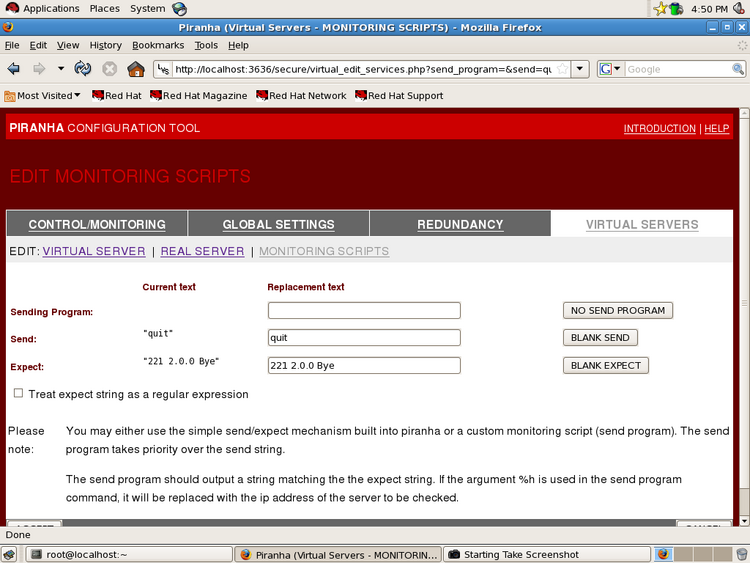
Illustration 6: Monitoring: specify an answer to a telnet session (example: smtp)
After the configuration has been finished the configuration must be synchronized to the second server. To accomplish this task the following files are copied via scp to node2222:
/etc/sysconfig/ha/lvs.cf
/etc/sysctl.conf
/etc/sysconfig/iptables
Firewall/packet filtering, ip forwarding and the pulse service must be enabled by rebooting the system.
The LVS configuration on the systems as example:
serial_no = 213
primary = 192.168.109.105
primary_private = 10.10.10.3
service = lvs
backup_active = 1
backup = 192.168.109.106
backup_private = 10.10.10.4
heartbeat = 1
heartbeat_port = 539
keepalive = 6
deadtime = 18
network = nat
nat_router = 192.168.109.116 bond0:1
nat_nmask = 255.255.255.0
debug_level = NONE
monitor_links = 0
virtual ox {
     active = 1
     address = 192.168.109.117 bond0:2
     vip_nmask = 255.255.255.0
     fwmark = 80
     port = 80
     persistent = 120
     expect = "OK"
     use_regex = 0
     send_program = "/bin/ox-mon.sh %h"
     load_monitor = none
     scheduler = rr
     protocol = tcp
     timeout = 6
     reentry = 15
     quiesce_server = 0
     server ox1 {
         address = 192.168.109.114
         active = 1
         weight = 1
     }
     server ox2 {
         address = 192.168.109.115
         active = 1
         weight = 1
     }
}
virtual imap {
     active = 1
     address = 192.168.109.117 bond0:3
     vip_nmask = 255.255.255.0
     fwmark = 143
     port = 143
     persistent = 120
     send = ". login xxx pw"
     expect = "OK"
     use_regex = 1
     load_monitor = none
     scheduler = rr
     protocol = tcp
     timeout = 6
     reentry = 15
     quiesce_server = 0
     server imap {
         address = 192.168.109.113
         active = 1
         weight = 1
     }
}
virtual smtp {
     active = 1
     address = 192.168.109.117 bond0:4
     vip_nmask = 255.255.255.0
     port = 25
     persistent = 120
     send = ""
     expect = "220"
     use_regex = 1
     load_monitor = none
     scheduler = rr
     protocol = tcp
     timeout = 6
     reentry = 15
     quiesce_server = 0
     server smtp {
         address = 192.168.109.113
         active = 1
         weight = 1
     }
}
virtual oxs {
     active = 0
     address = 192.168.109.117 bond0:5
     vip_nmask = 255.255.255.0
     fwmark = 80
     port = 443
     persistent = 120
     expect = "OK"
     use_regex = 0
     send_program = "/bin/ox-mon.sh %h"
     load_monitor = none
     scheduler = rr
     protocol = tcp
     timeout = 6
     reentry = 15
     quiesce_server = 0
     server ox1 {
         address = 192.168.109.114
         active = 1
         weight = 1
     }
     server ox2 {
         address = 192.168.109.115
         active = 1
         weight = 1
     }
}
virtual oxtender {
     active = 1
     address = 192.168.109.117 bond0:5
     vip_nmask = 255.255.255.0
     port = 44335
     persistent = 120
     expect = "OK"
     use_regex = 0
     send_program = "/bin/ox-mon.sh %h"
     load_monitor = none
     scheduler = rr
     protocol = udp
     timeout = 6
     reentry = 15
     quiesce_server = 0
     server ox1 {
         address = 192.168.109.114
         active = 1
         weight = 1
     }
     server ox2 {
         address = 192.168.109.115
         active = 1
         weight = 1
     }
}
- monitoring script for the Open-Xchange Server ox-mon.sh :
#!/bin/sh

/usr/bin/curl $1/servlet/TestServlet 2>&1 | grep TestServlet 2>&1
1>/dev/null
if test $? -gt 0
then
	echo "FALSE"
else
	echo "OK"
fi
Remarks
In the current configuration IMAP and IMAPS are bond together as one “service” with iptables firewall marks. The check for this service is a simple telnet check against IMAP. User name and password from the example must be set to the real ones ( xxx is the user and pw the password: send = ". login xxx pw").
In the current configuration HTTP, HTTPS and OXtender are bind together as one “service” with iptables firewall marks. The check for this service is done via a script /bin/ox-mon.sh.
In the current configuration SMTP is monitored with a simple telnet check.
HA Cluster
Abstract
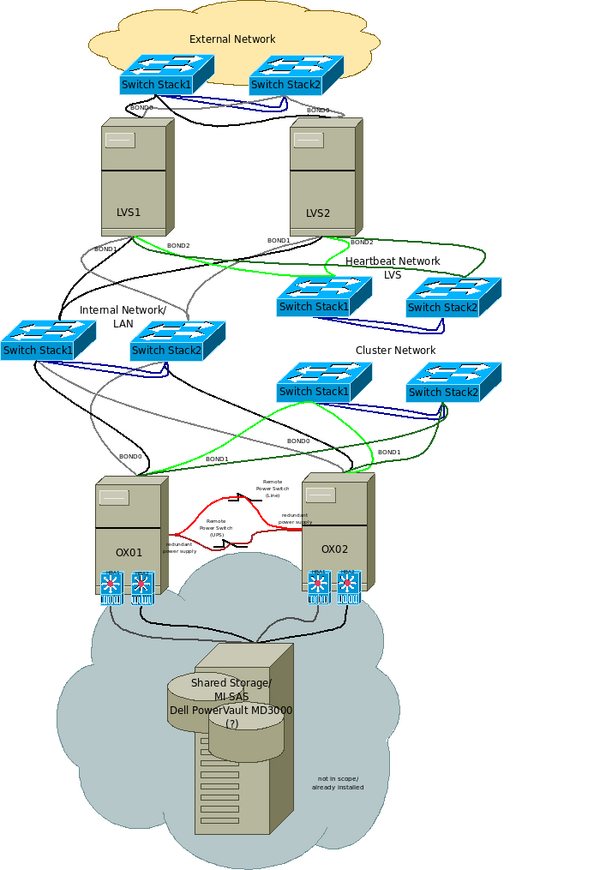
The RHEL HA Cluster is running on the two nodes node8888/192.168.109.102 and node9999/192.168.109.103. A “reduced” three-tier topology is used: in front of the cluster a LVS load balancer is routing the traffic to the services on the cluster. See sketch for the setup, IPs etc. Dell DRAC management hardware is used for fencing.
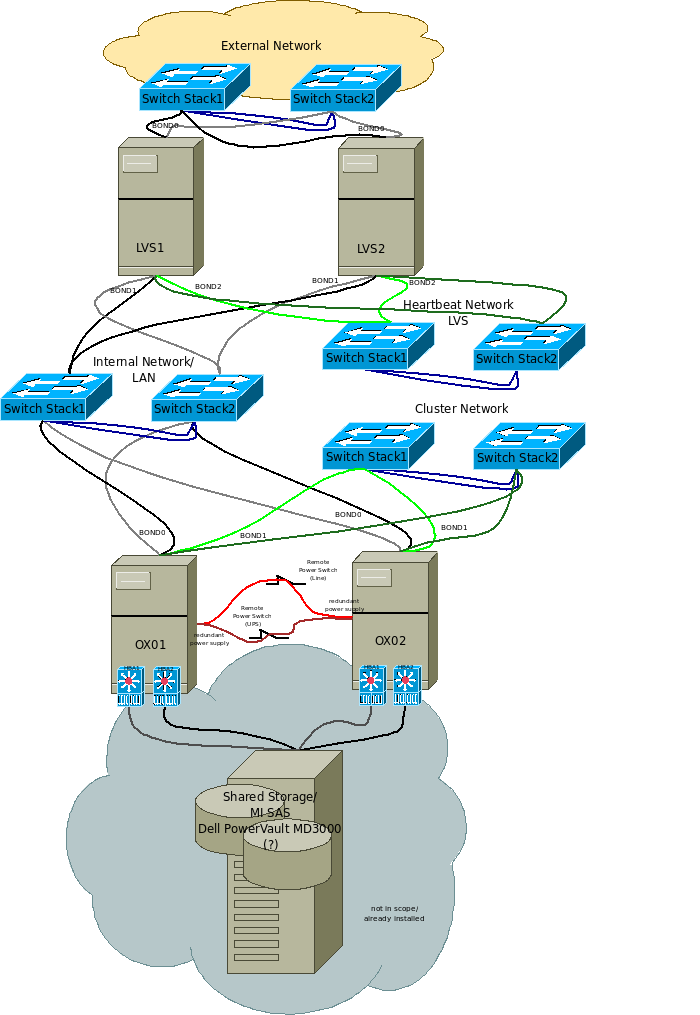 Illustration 7: Ideal Cluster configuration: network is heavily reduced in this documentation
- RHEL HA Cluster is running on node8888/192.168.109.102 and node9999/192.168.109.103
- Virtual Services are defined for Ox (active-active), IMAP+SMTP and Mysql. The services are build from globally defined cluster resources (e.g. IPs, filesystems etc.).
- Shared Storage is configured with LVM and three logical volumes are defined as resources for Ox (GFS2), Mysql (EXT3) and IMAP/SMTP (EXT3)
- Virtual IPs (seen as Real IPs from LVS) are defined for OX1/2 192.168.109.114 and 192.168.109.15, Mysql 192.168.109.112 and 192.168.109.118 and IMAP/SMTP 192.168.109.113
- Dell DRAC devices host fence devices are configured (192.168.105.234/192.168.105.235)
- The Conga web configuration interface is used to configure the cluster
Installation
On both systems a RHEL 5.3 operating system has to be installed and on top of the RHEL cluster suite. Because the Conga web interface is used to ease the configuration tasks the packages for the client-server system of Conga: ricci and luci need to be available on both systems.
- All packet filters are disabled to avoid impacts on the cluster:
system-config-securitylevel disable
service iptables stop
chkconfig –del iptables.
Check/edit the file /etc/sysconfig/system-config-securitylevel, the service must be set to disabled.
- Also selinux is disabled resp. set to permissive mode:
system-config-securitylevel disable
Check/edit the file /etc/selinux/config, the service must be set either to disabled or to permissive. If selinux was set to disabled and should be enabled again: set to permissive, boot, touch /.autorelabel, boot and set to enabled.
- IP forwarding is enabled in /etc/sysctl.conf, set net.ip4.ip_forward=1
- Network zeroconf is disabled in /etc/sysconfig/network a line is added NOZEROCONF=yes
- On both systems ACPI/the acpid is disabled to allow for immediate shutdown via fence device:
chkconfig --del acpid
- To configure both systems from conga the ricci serivce is started on both system:
chkconfig --level 2345
ricci on
service ricci start
- On the system node8888 also the luci service is enabled:
chkconfig --level 2345 luci on
Configuration
Network
In this example, a single network 192.168.109.0/24 for all real and virtual IPs and the private network 10.10.10.0/24 for the LVS internal communication is used. Via bonding of two physical devices the network devices bond0/1 have to be configured on both networks during the base installation.
On node8888 the network devices are configured as:
DEVICE=bond0
BOOTPROTO=none
BROADCAST=192.168.109.255
IPADDR=192.168.109.102
NETMASK=255.255.255.0
NETWORK=192.168.109.0
ONBOOT=yes
TYPE=Ethernet
GATEWAY=192.168.109.116
USERCTL=no
IPV6INIT=no
PEERDNS=yes
...
DEVICE=eth1
BOOTPROTO=none
BROADCAST=10.10.10.255
HWADDR=00:22:19:B0:73:2A
IPADDR=10.10.10.1
NETMASK=255.255.255.0
NETWORK=10.10.10.0
ONBOOT=yes
TYPE=Ethernet
USERCTL=no
IPV6INIT=no
PEERDNS=yes
And on node9999:
DEVICE=bond0
BOOTPROTO=none
BROADCAST=192.168.109.255
IPADDR=192.168.109.103
NETMASK=255.255.255.0
NETWORK=192.168.109.0
ONBOOT=yes
TYPE=Ethernet
GATEWAY=192.168.109.116
USERCTL=no
IPV6INIT=no
PEERDNS=yes
...
DEVICE=eth1
BOOTPROTO=none
BROADCAST=10.10.10.255
HWADDR=00:22:19:B0:73:2A
IPADDR=10.10.10.2
NETMASK=255.255.255.0
NETWORK=10.10.10.0
ONBOOT=yes
TYPE=Ethernet
USERCTL=no
IPV6INIT=no
PEERDNS=yes
Storage
A shared storage for the cluster LVM daemon has to be installed and running (part of the RHEL cluster suite). Physical volume, volume group and the logical volumes have to be created on the command line using the standard LVM tools (pvcreate/vgcreate etc.). The mount points /u01, /u02 and /u03 are to be created. This is the LVM configuration for this example:
  --- Physical volume ---
  PV Name               /dev/sdc
  VG Name               VGoxcluster
  PV Size               1.91 TB / not usable 2.00 MB
  Allocatable           yes
  PE Size (KByte)       4096
  Total PE              499782
  Free PE               80966
  Allocated PE          418816
  PV UUID               xxxxxxxxxxxxxxxxxxxx

  --- Volume group ---
  VG Name               VGoxcluster
  System ID
  Format                lvm2
  Metadata Areas        1
  Metadata Sequence No  16
  VG Access             read/write
  VG Status             resizable
  Clustered             yes
  Shared                no
  MAX LV                0
  Cur LV                3
  Open LV               2
  Max PV                0
  Cur PV                1
  Act PV                1
  VG Size               1.91 TB
  PE Size               4.00 MB
  Total PE              499782
  Alloc PE / Size       418816 / 1.60 TB
  Free  PE / Size       80966 / 316.27 GB
  VG UUID               yyyyyyyyyyyyyyyyyyyy

  --- Logical volume ---
  LV Name                /dev/VGoxcluster/LVmysql_u01
  VG Name                VGoxcluster
  LV UUID                Z4XFjg-ITOV-y19M-Rf7m-fJbI-0YXA-e8ueF8
  LV Write Access        read/write
  LV Status              available
  # open                 0
  LV Size                100.00 GB
  Current LE             25600
  Segments               1
  Allocation             inherit
  Read ahead sectors     auto
  - currently set to     256
  Block device           253:0

  --- Logical volume ---
  LV Name                /dev/VGoxcluster/LVimap_u03
  VG Name                VGoxcluster
  LV UUID                o0SvbN-buT9-4WvC-0Baw-rX3d-QwJo-t1jDL3
  LV Write Access        read/write
  LV Status              available
  # open                 1
  LV Size                512.00 GB
  Current LE             131072
  Segments               1
  Allocation             inherit
  Read ahead sectors     auto
  - currently set to     256
  Block device           253:1

  --- Logical volume ---
  LV Name                /dev/VGoxcluster/LVox_u02
  VG Name                VGoxcluster
  LV UUID                udx7Ax-L8ev-M5Id-W42Y-VbYs-8ag7-T78seI
  LV Write Access        read/write
  LV Status              available
  # open                 1
  LV Size                1.00 TB
  Current LE             262144
  Segments               1
  Allocation             inherit
  Read ahead sectors     auto
  - currently set to     256
  Block device           253:2
Initialize Conga
Configure luci admin password and restart the service:
- luci_admin init, and specify the admin password
- service luci restart
Open a browser and navigate to the luci address/port:
Populate the Cluster
Now the cluster, it's nodes, storage, resources and services can be defined in the luci web frontend.
The following services must be defined:
MySQL
- IP 192.168.109.112
- IP 192.168.109.118
- Script /etc/init.d/mysql
- Filesystem /dev/mapper/VGoxcluster-LVmysql_u01; EXT3; mount on /u01
- Data directory: /var/lib/mysql is installed on /u01
- The original data is (re)moved on the systems to the shared storage
- A soft link points from the default data location to the shared storage
IMAP/S, Sieve, SMTP
- IP 192.168.109.113
- Script /etc/init.d/cyrus-imapd
- Script /etc/init.d/postfix
- Filesystem /dev/mapper/VGoxcluster-LVimap_u03; EXT3; mount on /u03
- Data directories: /var/spool/postfix, /etc/postfix, /var/spool/imap, /var/lib/imap are installed on /u03
- The original data is (re)moved on the systems to the shared storage
- Soft links point from the default data location to the shared storage
Ox1, Ox2
The Ox services may not run on one node in case of a node failure!. Therefore a failover domain must be defined with just a single node as domain member. This service should only run on node “Ox1”!
- IP 192.168.109.114, 192.168.109.115
- Script /etc/init.d/open-xchange-admin
- Script /etc/init.d/open-xchange-groupware
- Filesystem /dev/mapper/VGoxcluster-LVox_u02; GFS2; mount on /u02
- Data directory: /filestore is installed on /u02
- The original data is (re)moved on the systems to the shared storage
- Soft links point from the default data location to the shared storage
- Failoverdomains must be specified for each of the services
In the following pictures the configuration of a cluster is shown.
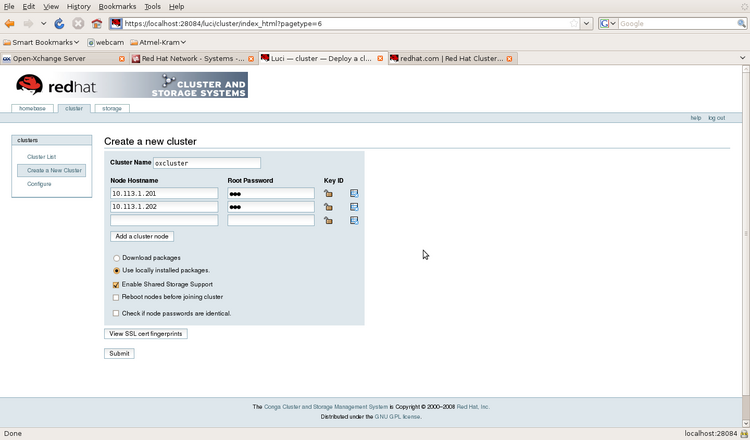
Illustration 8: Creating a new cluster
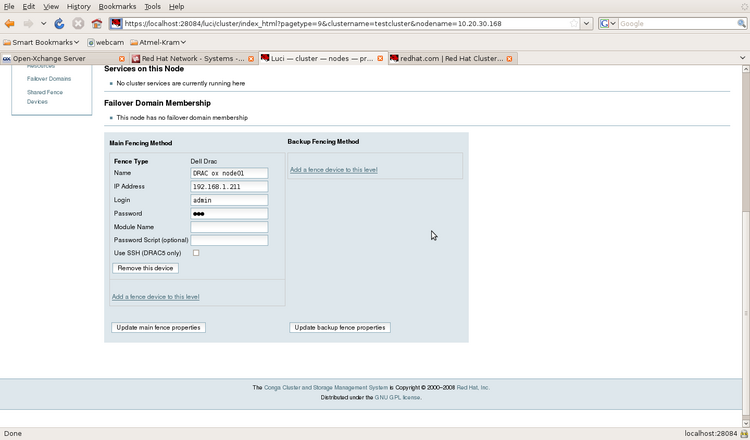
Illustration 9: Defining node fence devices
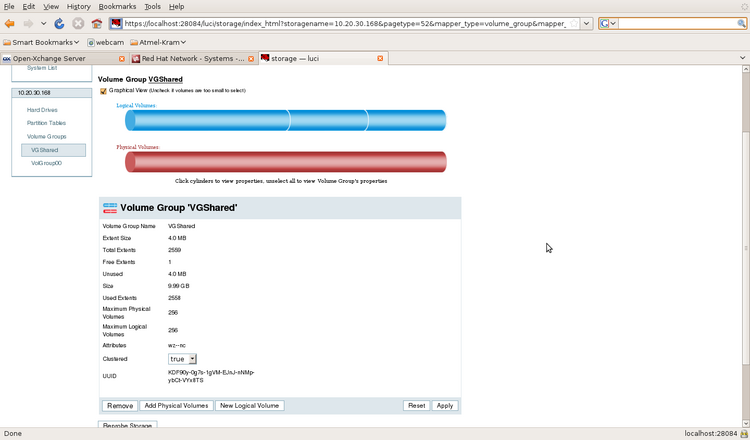
Storage configuration: three volumes on the shared storage are available: an EXT3 volume for the MySQL database, another EXT3 volume for the mail services (smtp, imap) and a store for the Ox servers, the latter a GFS2 volume. The mount points for the storage must already exist.
Afterwards the storage can be configured from Conga:
- Click on storage tab and then on one of the both node IPs in the node list
- Choose the volume group which contains the shared volumes
- A graphical view of the volumes in this group is shown
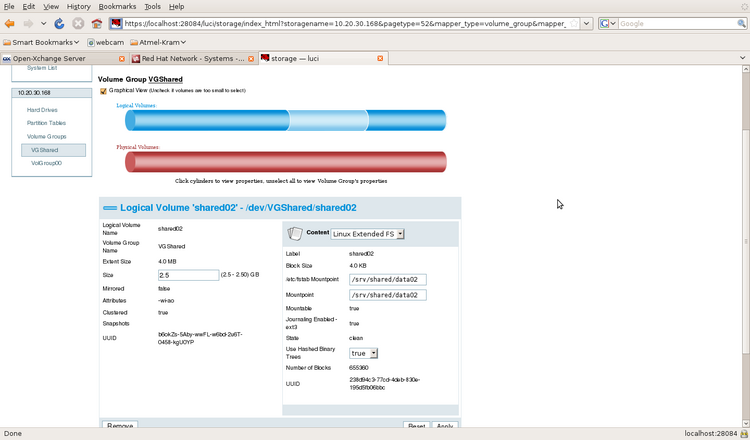
Illustration 10: On the top (blue) column the available volumes on this volume group are visible as column slices, to modify a volume (moving the mouse over the slice will reveal the name of the volume) click on it. If a volume is selected the column view will change: the part of the chosen volume is hatched now.
Illustration 11: Defining a logical volume
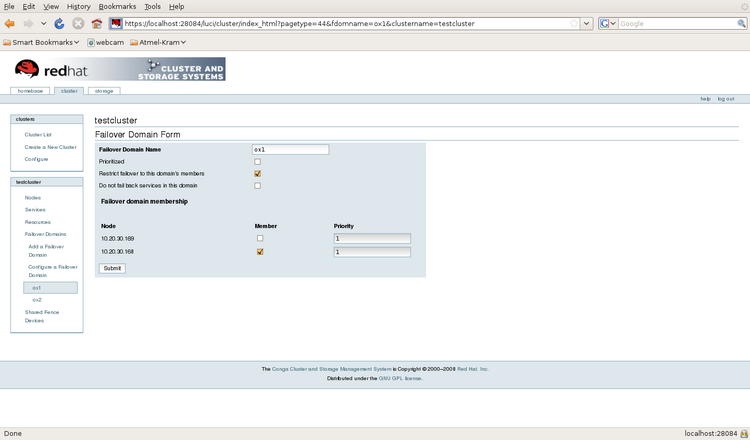
The ox services should run on only one node under any circumstances. Two failover domains are configured with a single node as member and both ox services will be bound to one of the failover domains. If one node will fail the ox service running on this node will not be relocated to the other node.
Illustration 12: Configuring a failover domain
Defining services
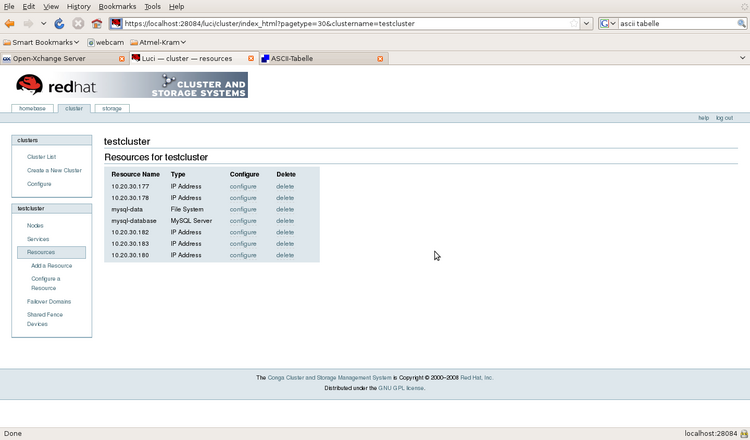
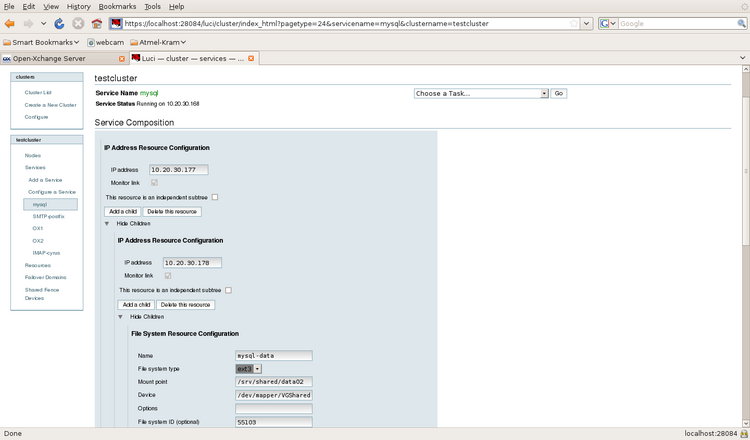
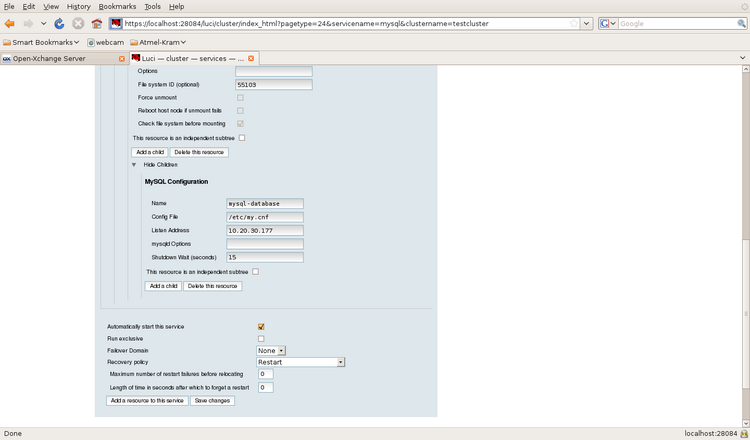
Every resources is defined as a global resource. Therefore the services are build from globally available resources. Each service is build up as a independent tree of resources. The priority of RHEL cluster is used to group the resources in a service. The order of resources is the same as the priority order (filesystems first, IPs second, followed by services -which are not used in this installation- and finally followed by scripts).
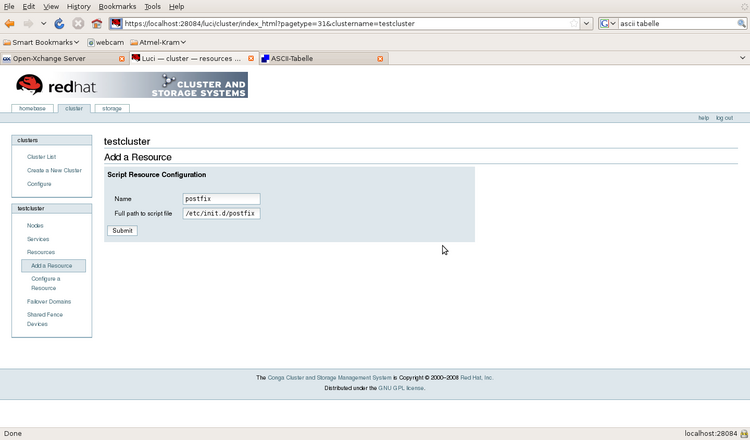
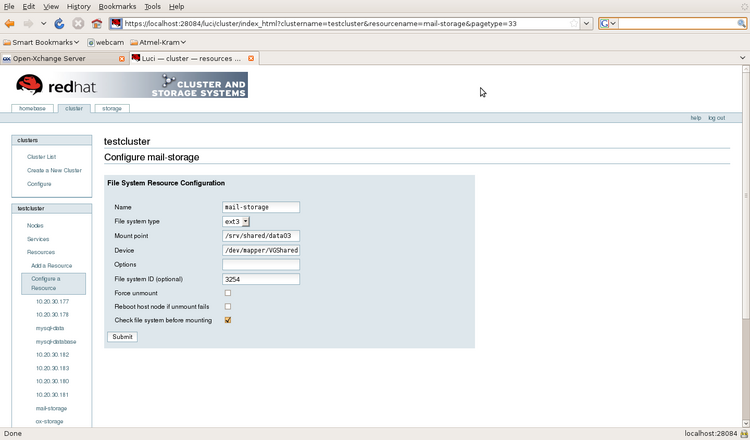
Illustration 13: Example of a resource list
Illustration 14: Example of a Script Resource
Illustration 15: Example of a Filesystem Resource
Illustration 16: Defining a Service from Resources, 1)
Illustration 17: Defining a Service from Resources, 2)
Cluster Configuration File
The configuration file /etc/cluster/cluster.conf
<?xml version="1.0"?>
<cluster alias="oxcluster2" config_version="61" name="oxcluster2">
<fence_daemon clean_start="0" post_fail_delay="60" post_join_delay="600"/>
<clusternodes>
<clusternode name="10.10.10.1" nodeid="1" votes="1">
<fence>
<method name="1">
<device name="ox1drac"/>
</method>
</fence>
<multicast addr="239.192.223.20" interface="eth1"/>
</clusternode>
<clusternode name="10.10.10.2" nodeid="2" votes="1">
<fence>
<method name="1">
<device name="ox2drac"/>
</method>
</fence>
</clusternode>
</clusternodes>
<cman expected_votes="1" two_node="1">
<multicast addr="239.192.223.20"/>
</cman>
<fencedevices>
<fencedevice agent="fence_drac" ipaddr="192.168.105.234" login="root" name="ox1drac" passwd="pass"/>
<fencedevice agent="fence_drac" ipaddr="192.168.105.235" login="root" name="ox2drac" passwd="pass"/>
</fencedevices>
<rm>
<failoverdomains>
<failoverdomain name="ox1_failover" nofailback="0" ordered="0" restricted="1">
<failoverdomainnode name="10.10.10.1" priority="1"/>
</failoverdomain>
<failoverdomain name="ox2_failover" nofailback="0" ordered="0" restricted="1">
<failoverdomainnode name="10.10.10.2" priority="1"/>
</failoverdomain>
</failoverdomains>
<resources>
<ip address="192.168.109.112" monitor_link="1"/>
<ip address="192.168.109.113" monitor_link="1"/>
<ip address="192.168.109.114" monitor_link="1"/>
<ip address="192.168.109.115" monitor_link="1"/>
<ip address="192.168.109.118" monitor_link="1"/>
<fs device="/dev/mapper/VGoxcluster-LVimap_u03" force_fsck="1" force_unmount="0" fsid="8322" fstype="ext3" mountpoint="/u03" name="imap_filesystem" self_fence="0"/>
<fs device="/dev/mapper/VGoxcluster-LVmysql_u01" force_fsck="1" force_unmount="0" fsid="22506" fstype="ext3" mountpoint="/u01" name="mysql_filesystem" self_fence="0"/>
<script file="/etc/init.d/postfix" name="postfix_script"/>
<script file="/etc/init.d/cyrus-imapd" name="imap_script"/>
<script file="/etc/init.d/open-xchange-admin" name="ox_admin"/>
<script file="/etc/init.d/open-xchange-groupware" name="ox_groupware"/>
<script file="/etc/init.d/mysql" name="mysql_server"/>
<script file="/etc/init.d/mysql-monitor-agent" name="mysql_monitor"/>
<clusterfs device="/dev/mapper/VGoxcluster-LVox_u02" force_unmount="0" fsid="45655" fstype="gfs2" mountpoint="/u02" name="ox_filesystem" self_fence="0"/>
</resources>
<service autostart="1" exclusive="0" name="imap_smtp" recovery="restart">
<fs ref="imap_filesystem"/>
<ip ref="192.168.109.113"/>
<script ref="imap_script"/>
<script ref="postfix_script"/>
</service>
<service autostart="1" domain="ox1_failover" exclusive="0" name="ox1" recovery="restart">
<clusterfs fstype="gfs" ref="ox_filesystem"/>
<ip ref="192.168.109.114"/>
<script ref="ox_admin"/>
<script ref="ox_groupware"/>
</service>
<service autostart="1" domain="ox2_failover" exclusive="0" name="ox2" recovery="restart">
<clusterfs fstype="gfs" ref="ox_filesystem"/>
<ip ref="192.168.109.115"/>
<script ref="ox_admin"/>
<script ref="ox_groupware"/>
</service>
<service autostart="1" exclusive="0" name="mysql" recovery="restart">
<fs ref="mysql_filesystem"/>
<ip ref="192.168.109.112"/>
<ip ref="192.168.109.118"/>
<script ref="mysql_server"/>
</service>
</rm>
</cluster>
Remarks
- Restarting/Relocating: the policy how a failed service is handled can be defined as either to relocate the service to another node, to restart the service on the node or to disable the service. All services are configured to restart the whole service if any of the resources of the service will fail.
