Open-Xchange cPanel Installation
Install Open-Xchange on WHM/cPanel
Mode of operation
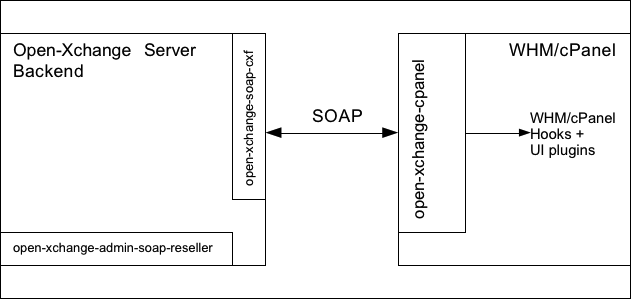
It is recommended to run Open-Xchange on one or more separate machines. See the "Hosting Edition deployment tutorials" at Main_Page_HESE#quickinstall. The connection between cPanel and Open-Xchange is done via some cPanel/WHM hooks and UI plugins using SOAP as communication channel. That means that SOAP must be enabled on Open-Xchange.
Once the package open-xchange-cpanel is installed on the cPanel/WHM system, every cPanel user created within WHM will be created as an admin account and context in Open-Xchange. In addition, there's a single program to create all existing cPanel Accounts in Open-Xchange.
Availability
OXtender for cPanel is available with a valid Open-Xchange Hosting Edition license. To get pricing information that meeets your individual requirements, please contact Open-Xchange at http://www.open-xchange.com/en/solutions/cpanel/shop.html
Known issues 1.0.0 Rev1
- using https in Open-Xchange Instance Address does not work in cPanel (it works in whm, but in cpanel, users will get an error when clicking on the Open-Xchange plugin)
- If you have existing cpanel plugins that use /script hooks (or /usr/local/cpanel/script), as well as /usr/local/cpanel/hooks, take care to make a backup of these files because they will be replaced by the open-xchange-cpanel rpm
- Users with the same email localpart from different domains in a single cPanel account and a single context do not work because user names as well as display names must be unique
- cPanel account names cannot be renamed when using the ox integration
- Error handling needs to be improved.
- Add-on domain handling needs to be improved
- Unable to indicate errors in open-xchange account creation when adding users in WHM/cPanel because the WHM/cPanel hooks have no possibility
Release Notes
To download the Release Notes, follow this: Download
Install and prepare Open-Xchange
Follow one of the Open-Xchange installation guides to install Open-Xchange with the following exceptions:
- Do not install the package open-xchange-mailfilter. cPanel does not support SIEVE at the moment.
- Install the package open-xchange-admin-plugin-reseller-soap from the repository http://software.open-xchange.com/OX6/OXtender-stable/cPanel/ (see below)
- Instead of open-xchange-authentication-database, install the package open-xchange-authentication-imap
- Do NOT create a context, just follow the installation guide up to the database registration
- Add the following argument to initconfigdb: --addon-sql "reseller.sql autocid.sql"
Install on OX AppSuite
Debian GNU/Linux 11.0
Add the following entry to /etc/apt/sources.list.d/open-xchange.list if not already present:
deb https://software.open-xchange.com/products/OXtender-stable/cPanel/DebianBullseye/ /
# if you have a valid maintenance subscription, please uncomment the
# following and add the ldb account data to the url so that the most recent
# packages get installed
# deb https://[CUSTOMERID:PASSWORD]@software.open-xchange.com/products/OXtender-stable/cPanel/updates/DebianBullseye/ /
and run
$ apt-get update
$ apt-get install open-xchange-admin-plugin-reseller-soap
Debian GNU/Linux 12.0
Add the following entry to /etc/apt/sources.list.d/open-xchange.list if not already present:
deb https://software.open-xchange.com/products/OXtender-stable/cPanel/DebianBookworm/ /
# if you have a valid maintenance subscription, please uncomment the
# following and add the ldb account data to the url so that the most recent
# packages get installed
# deb https://[CUSTOMERID:PASSWORD]@software.open-xchange.com/products/OXtender-stable/cPanel/updates/DebianBookworm/ /
and run
$ apt-get update
$ apt-get install open-xchange-admin-plugin-reseller-soap
Preparation
- run the command
$ /opt/open-xchange/sbin/initrestrictions -A oxadminmaster -P secret
once you've finished the open-xchange installation
- Take care to install the packages open-xchange-gui-wizard-plugin open-xchange-gui-wizard-plugin-gui. The wizard must be used to enforce the user to provide a real valid displayname.
- edit file /opt/open-xchange/etc/groupware/imapauth.properties and set
USE_MULTIPLE=true
- edit file /opt/open-xchange/etc/groupware/settings/open-xchange-gui-wizard-plugin.properties and set
ui/wizard/firstrunmode=true
- edit file /opt/open-xchange/etc/groupware/mail.properties and set
com.openexchange.mail.adminMailLoginEnabled=true
- edit file /opt/open-xchange/etc/groupware/sessiond.properties and set
com.openexchange.sessiond.autologin=true
- edit file /opt/open-xchange/etc/admindaemon/User.properties and set
PRIMARY_MAIL_UNCHANGEABLE=false
Install and prepare WHM/cPanel on CentOS5
Note: Choose either CentOS5 or RHEL5. Nothing else is supported to integrate Open-Xchange with cPanel.
Important: If you have existing cpanel plugins that use /script hooks (or /usr/local/cpanel/script), as well as /usr/local/cpanel/hooks, take care to make a backup of these files because they will be replaced by the open-xchange-cpanel rpm
- Follow the installation guide http://docs.cpanel.net/twiki/bin/view/AllDocumentation/InstallationGuide/Quick-StartInstallationGuide
- run /scripts/upcp
- run /scripts/perlinstaller SOAP::Lite
NOTE: This can take very long and it might look like it is hanging at
We are about to install SOAP::Lite and for your convenience will provide
you with list of modules and prerequisites, so you'll be able to choose
only modules you need for your configuration.

XMLRPC::Lite, UDDI::Lite, and XML::Parser::Lite are included by default.
Installed transports can be used for both SOAP::Lite and XMLRPC::Lite.

Press <enter> to see the detailed list.
Just be patient and wait for it to finish.
- add the repository http://software.open-xchange.com/OX6/OXtender-unstable/cPanel/RHEL5 to your yum configuration
$ vi /etc/yum.repos.d/oxintegration.repo
[oxcpintegration]
name=Open-Xchange cPanel
baseurl=http://LDBACCOUNT:LDBPASSWORD@software.open-xchange.com/OX6/OXtender-stable/cPanel/RHEL5
gpgkey=http://software.open-xchange.com/oxbuildkey.pub
enabled=1
gpgcheck=1
metadata_expire=0m
- install the package open-xchange-cpanel
$ yum install open-xchange-cpanel
- run the installer (-h for help):
$ /usr/local/cpanel/bin/oxcpanelinstall --oxurl http://ox.example.com --oxadmin-password oxadminmasterpassword
Now your Open-Xchange server is integrated with your cPanel installation.
To check the connection, run
$ /usr/local/cpanel/bin/oxcpanelenable -c
This program can also be used to enable all existing cPanel users in OX. Run
$ /usr/local/cpanel/bin/oxcpanelenable -h
for more information.
Debugging
- run the command
$ sudo /usr/local/cpanel/bin/oxcpanelenable -c
to check Open-Xchange connection before doing anything else. It must output connection check successfull
- All errors happening during cPanel account creation and mail account creation are logged into the files /usr/local/cpanel/logs/open-xchange_log and /usr/local/cpanel/logs/error_log. If something does not work, check these logs first!
- /usr/local/cpanel/bin/oxcpanelinstall creates a debug output file with every execution, check its output, e.g.:
$ /usr/local/cpanel/bin/oxcpanelinstall --oxurl http://myox.example.com --oxadmin-password secret
running installer, please wait. Debugoutput is placed into file /tmp/cpoxinst3542.out
WHM OX Plugin Usage
To create Open-Xchange accounts, nothing else is required than to create cPanel accounts as usual. Due to the design of the WHM plugin mechanism, however, it is not possible to indicate any errors that might happen when creating the account in Open-Xchange fails.
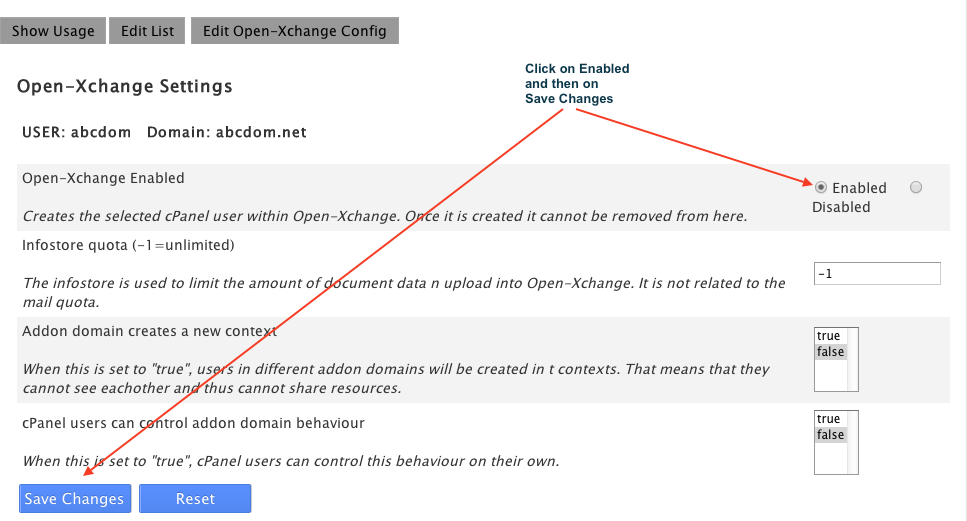
You can easily check, however, if the Open-Xchange account creation failed when you open the Open-Xchange plugin which can be found in the left menu in WHM almost on the bottom.
Failed attempts to create an ox accounts can be seen there because in that case, the account is not enabled. In such a case you need to Terminate that account and create it again after you fixed the reason for the failed attempt. Check the logs for errors.
In addition you will find all relevant error messages in /usr/local/cpanel/logs/open-xchange_log and /usr/local/cpanel/logs/error_log.
cPanel OX Plugin Usage
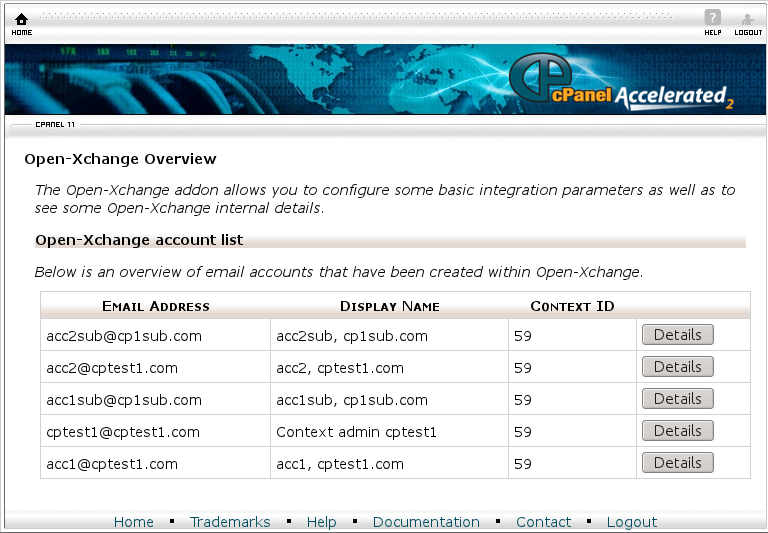
To create email accounts in Open-Xchange, nothing else is required than to create email accounts in cPanel. Due to the design of the cPanel plugin mechanism, however, it is not possible to indicate any errors that might happen when creating the account in Open-Xchange fails.
To check whether the email account creation fails, just open the Open-Xchange plugin and check if the recently created email account(s) appear in the list. If not, contact your hosting provider or, if you are the owner of the machine, you will find all relevant error messages in /usr/local/cpanel/logs/open-xchange_log and /usr/local/cpanel/logs/error_log.


