Caldav carddav Bundles
Using CalDAV and CardDAV with Open-Xchange
Beginning with the 6.20.1 release, Open-Xchange provides interfaces to connect CalDAV- and CardDAV-clients. Please note that at first only MacOS X (beginning with version 10.6 "Snow Leopard") with its clients "iCal" and "Address Book" is supported. This will change later and support for other clients such as Thunderbird will be added.
Preparation
Please edit your file /etc/apache2/ox6.conf so that the existing configuration for ox as well as the new configuration for CalDAV and CardDav is placed inside a virtual host.
This is an example where MYSERVER.TLD is the domain-name of the ox-server:
$ vi /etc/apache2/ox6.conf
  NameVirtualHost *:80
  <VirtualHost *:80>
  ServerName dav.MYSERVER.TLD
   ErrorLog /tmp/dav.err.log
   TransferLog /tmp/dav.access.log
   <Proxy />
       Order allow,deny
       Allow from all
   </Proxy>
   ProxyPass / ajp://localhost:8009/servlet/dav/ smax=0 ttl=60 retry=5
  </VirtualHost>
  <VirtualHost *:80>
   ServerName MYSERVER.TLD
  <Location /ox6>
       # Expires (via ExpiresByType to override global settings)
       ExpiresByType image/gif "access plus 6 months"
       ExpiresByType image/png "access plus 6 months"
       ExpiresByType image/jpg "access plus 6 months"
       ExpiresByType image/jpeg "access plus 6 months"
       ExpiresByType text/css "access plus 6 months"
       ExpiresByType text/html "access plus 6 months"
       ExpiresByType text/xml "access plus 6 months"
       ExpiresByType text/javascript "access plus 6 months"
       ExpiresByType text/x-js "access plus 6 months"
       ExpiresByType application/x-javascript "access plus 6 months"
       ExpiresDefault "access plus 6 months"
       Header append Cache-Control "private"
       Header unset Last-Modified
       Header unset Vary
       # Strip version
       RewriteEngine On
       RewriteRule v=\w+/(.+) $1 [L]
       # Turn off ETag
       Header unset ETag
       FileETag None
  </Location>
  <Location /ox6/ox.html>
       ExpiresByType text/html "now"
       ExpiresDefault "now"
       Header unset Last-Modified
       Header set Cache-Control "no-store, no-cache, must-revalidate, post-check=0, pre-check=0"
       # Turn off ETag
       Header unset ETag
       FileETag None
  </Location>
  <Location /ox6/index.html>
       ExpiresByType text/html "now"
       ExpiresDefault "now"
       Header unset Last-Modified
       Header set Cache-Control "no-store, no-cache, must-revalidate, post-check=0, pre-check=0"
       # Turn off ETag
       Header unset ETag
       FileETag None
  </Location>
  <Location /ajax>
  SetOutputFilter DEFLATE
  </Location>
  </VirtualHost>
Install on OX AppSuite
Debian GNU/Linux 11.0
Add the following entry to /etc/apt/sources.list.d/open-xchange.list if not already present:
deb https://software.open-xchange.com/products/stable/DebianBullseye/ /
# if you have a valid maintenance subscription, please uncomment the
# following and add the ldb account data to the url so that the most recent
# packages get installed
# deb https://[CUSTOMERID:PASSWORD]@software.open-xchange.com/products/stable/updates/DebianBullseye/ /
and run
$ apt-get update
$ apt-get install open-xchange-caldav open-xchange-carddav open-xchange-webdav-acl open-xchange-webdav-directory
Debian GNU/Linux 12.0
Add the following entry to /etc/apt/sources.list.d/open-xchange.list if not already present:
deb https://software.open-xchange.com/products/stable/DebianBookworm/ /
# if you have a valid maintenance subscription, please uncomment the
# following and add the ldb account data to the url so that the most recent
# packages get installed
# deb https://[CUSTOMERID:PASSWORD]@software.open-xchange.com/products/stable/updates/DebianBookworm/ /
and run
$ apt-get update
$ apt-get install open-xchange-caldav open-xchange-carddav open-xchange-webdav-acl open-xchange-webdav-directory
Configuration
Mac OSX Address Book
- Click the "+" sign in Address Book -> Preferences -> Accounts.
- In the "Account type" field keep "CardDAV" selected
- In the "User name" field enter your username replacing "@" with "*" (e.g. enter "peter.fraser*CONTEXTNAME" if you normally log in to OX with the username "peter.fraser@CONTEXTNAME".)
- In the "Password" field enter your password
- In the "Server address" field enter the path to the OX server as follows: dav.MYSERVER.TLD:80
- Click "Create"

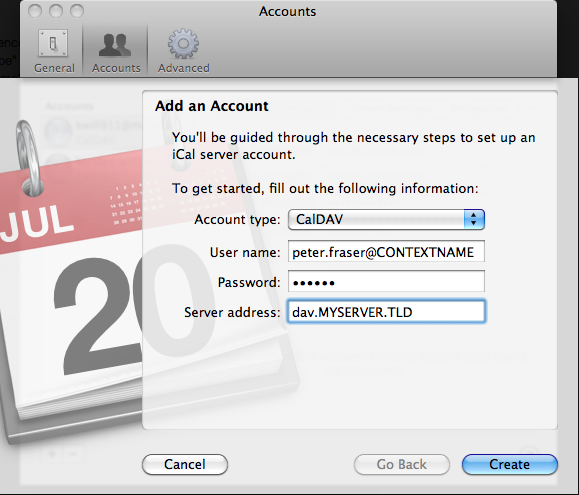
Mac OS X iCal
- Click the "+" sign in iCal -> Preferences -> Accounts
- As "Account type" select "CalDAV"
- In the "User name" field enter your username
- In the "Password" field enter your password
- In the "Server address" field enter your server address with the prefix "dav."
- Click "Create"
- Click "Continue"
