AppSuite:OX Tutorial 10K
Tutorial: OX AppSuite Setup for up to 10.000 users
This article describes what you need for a typical OX AppSuite Setup for up to 10.000 Users with minimal efforts.
It contains everything you need to:
- Understand the design of the OX AppSuite setup including additional services
- Install the whole system based on the relevant articles
- Find pointers to the next steps of integration
System Design
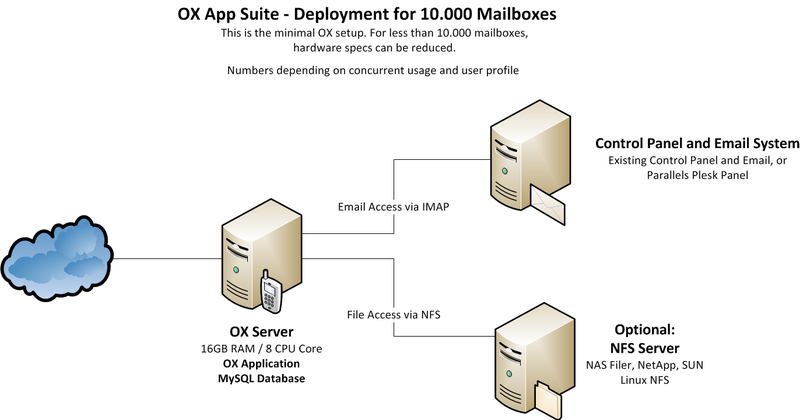
The system is designed to provide maximum functionality with a minimum of necessary hardware. All OX services are running on one single machine.
Core Components for OX AppSuite
- One OX AppSuite server (HW recommendation: 16GB RAM / 4 cores)
- MySQL installed directly on this server
- Optional: NFS Server to store documents and files
Infrastructure Components not delivered by OX
- An email system providing IMAP and SMTP
- A control panel for creation and administration of users
Overview Installation Steps
To deploy the described OX setup, the following steps need to be done.
Mandatory Steps
- Initialize and configure MySQL database
- Install and configure OX service
Steps depending on your environment
- Connect Control Panel
- Connect Email System
Recommended Optional Next Steps
- Automated Frontend Tests (see here)
- Upsell Plugin (see here and here)
- Automatic FailOver
- Theming (see here)
Mandatory Installation Steps - Instructions & Recommendations
The following steps need to be done in every case to get OX up and running:
Install and configure OX
OX will be installed on the server.
- Download and Installation Guide for Debian GNU/Linux 6.0 (Squeeze)
- Download and Installation Guide for Debian GNU/Linux 7.0 (Wheezy)
- Download and Installation Guide for SUSE Linux Enterprise Server 11
- Download and Installation Guide for RedHat Enterprise Linux 6
You also should install and configure the OXtender for Business Mobility
Installation of the OXtender for Business Mobility
Let your users connect to their data from other services like Twitter or LinkedIn (removed since 7.10.0) by configuring the "SocialOX"
Installation Steps depending on your environment - Instructions & Recommendations
The following components need to be implemented in your environment.
Connect Control Panel
You need a Control Panel to create and edit users.
OX is designed to integrate into every solution you may already run in your environment and also into wide spread solutions, like the Parallels Control Panels.
If you do not run hosting services today and do not have a Control Panel in place, it is recommend to use Plesk to manage OX. With that combination you will get a full functional hosting platform containing everything you need.
Integrate your own Control Panel
If you already have a Control Panel in production, you should integrate OX with it. It is recommended to use the SOAP provisioning Interface for that purpose.
Read more about: Provisioning using SOAP
A good start to test and to understand the necessary commands are the Command Line Tools. They have exactly the same calls like the SOAP API.
Read more about: Open-Xchange CLT
Integrate with Plesk Panel
If you want to use Parallels Plesk Panel to manage your users, there is an OXtender available to integrate OX into the Plesk Panel.
Read more about installing Plesk_Integration
Authentication
To avoid password synchronization issues, it is recommended to use your existing email authentication mechanism within OX. Then you do not need to add user passwords to OX, you simply use a plugin to authenticate against your IMAP server.
Read more about the IMAP Authentication Plugin
Connect Email System
Every email system providing IMAP and SMTP can be used as backend to OX. Best experiences are made with the widespread Linux based IMAP servers Dovecot, Cyrus or Courier.
Other IMAP servers need to be tested thoroughly before going into production.
There are several possibilities to implement the Email system:
- You already have an email system available: Nothing needs to be done, it just needs to be configured
- You use Plesk Panel: Nothing special needs to be done, everything you need is contained in the OXtender for Plesk
- You want to setup a new Email system: It is recommended to use Dovecot, as this is very stable, fast, feature rich and easy to scale
Dovecot Setup
If you want to setup a new Email system based on Dovecot, it is recommended to use NFS as storage backend and to install at least two Dovecot servers, accessing this storage. With that setup you have best scalability and high availability with a minimum of complexity and hardware.
Read more in the Dovecot documentation including a QuickConfiguration guide
Recommended Optional Next Steps
You will find plenty of additional documentation for customization of OX in our knowledge base [1]
When the main setup is completed, we recommend to start with the following articles to enhance your system and to become more attractive for your users.
Monitoring / Statistics
It is recommended to implement at least a minimal monitoring/Statistics solution to get an overview of the systems health. If you have a support contract with Open-Xchange, it is very helpful, if the support can access the monitoring graphs. There are example scripts for a basic monitoring with [Munin] available.
Read more about installing and configuring Munin scripts for Open-Xchange
Backup
It is recommended to run regular backups for your OX installation. This can be done with every backup solution for Linux.
Read more about Backup your Open-Xchange installation
