Twitter Bundles: Difference between revisions
(Created page with "= Using Twitter with Open-Xchange = == Preparation == You MAY want to replace the standard configuration of twitter integration. This depends on whether you want your own co...") |
(clean up, new screenshots) |
||
| (One intermediate revision by the same user not shown) | |||
| Line 8: | Line 8: | ||
* Log into Twitter | * Log into Twitter | ||
* Click "Create a new application" on the right | * Click "Create a new application" on the right | ||
Make sure that you update to the latest version of Open-Xchange Appsuite. | |||
[[File:Twitter_new_01.png]] | [[File:Twitter_new_01.png]] | ||
| Line 18: | Line 20: | ||
[[File:Twitter_new_02.png]] | [[File:Twitter_new_02.png]] | ||
'''Note:''' the callback URL has to be https and with the /ajax/defer path at the end. | |||
* In the following overview click " | * In the following overview click "Keys and Access Tokens" | ||
[[File:Twitter_new_04.png]] | [[File:Twitter_new_04.png]] | ||
* Change " | |||
* Change in the "Permissions" tab "Read only" to "Read and Write" (should be default) | |||
* Click "Update settings" | |||
You can also update: | |||
* Fill "Organization name" and "Organization website" if wanted | * Fill "Organization name" and "Organization website" if wanted | ||
* Upload a custom application icon if wanted | * Upload a custom application icon if wanted | ||
Edit the file /opt/open-xchange/etc/twitteroauth.properties and insert the key and secret from the settings page above, like this: | |||
<pre> | |||
com.openexchange.oauth.twitter.apiKey=0JtyhCeuc7kZotWGx037jxlsG | |||
com.openexchange.oauth.twitter.apiSecret=n8y34hSfeLa0kCizUrcnYjeUg49OfIz7De8SiKZ4TKwfKWYppj | |||
</pre> | |||
{{InstallPlugin|pluginname=open-xchange-oauth open-xchange-messaging|toplevel=products |sopath=appsuite/stable/backend |version=App Suite}} | {{InstallPlugin|pluginname=open-xchange-oauth open-xchange-messaging|toplevel=products |sopath=appsuite/stable/backend |version=App Suite}} | ||
{{InstallPlugin|pluginname=open-xchange-oauth | {{InstallPlugin|pluginname=open-xchange-oauth|sopath=stable}} | ||
== Configuration == | == Configuration == | ||
Latest revision as of 09:33, 19 July 2018
Using Twitter with Open-Xchange
Preparation
You MAY want to replace the standard configuration of twitter integration. This depends on whether you want your own company-name to be shown to users during the twitter authentication process. If you want this please follow these steps:
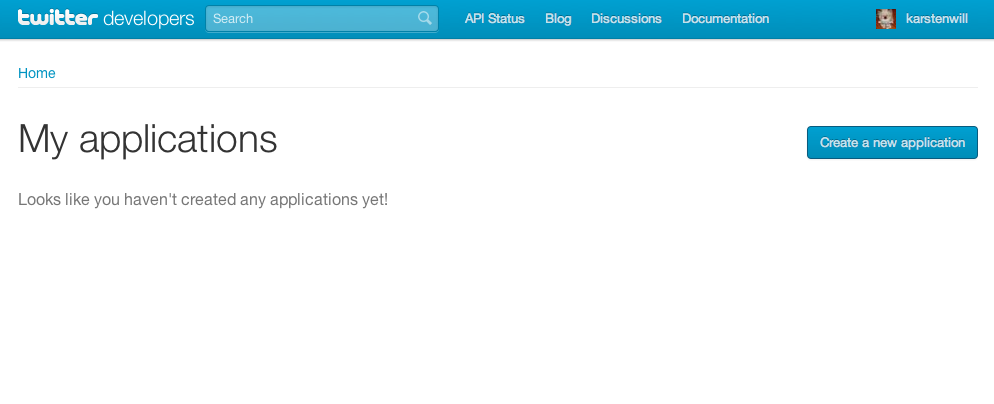
- Go to https://dev.twitter.com/apps
- Log into Twitter
- Click "Create a new application" on the right
Make sure that you update to the latest version of Open-Xchange Appsuite.
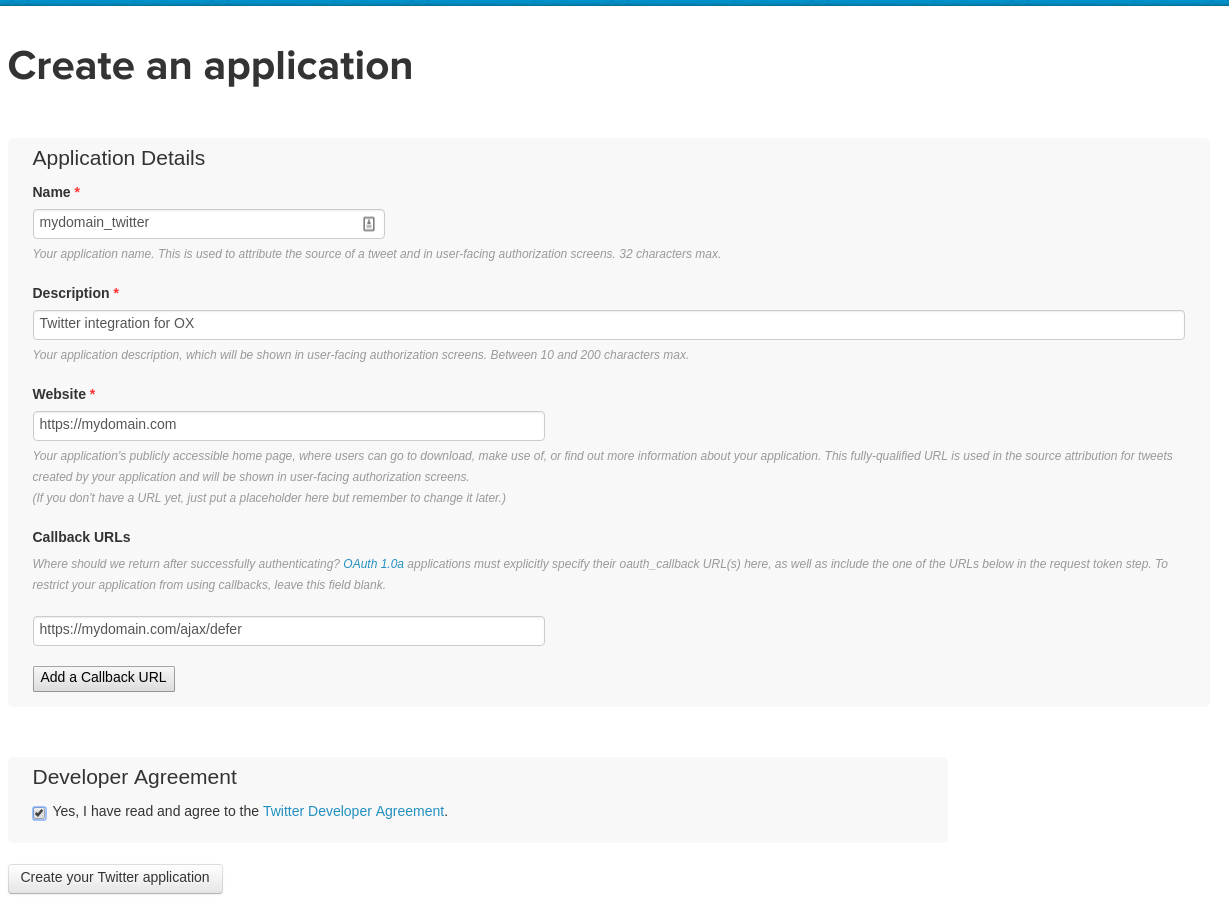
- Enter appropriate Information in "Name", "Description", "Website" and "Callback URL". "Callback URL" should be the URL by which the Server is reachable (This is not checked at this moment but may be in the future).
- Enter the text displayed in the captcha into the textfield below
- Check "Yes, I agree" under "Developer Rules Of The Road"
- Click "Create your Twitter application"
Note: the callback URL has to be https and with the /ajax/defer path at the end.
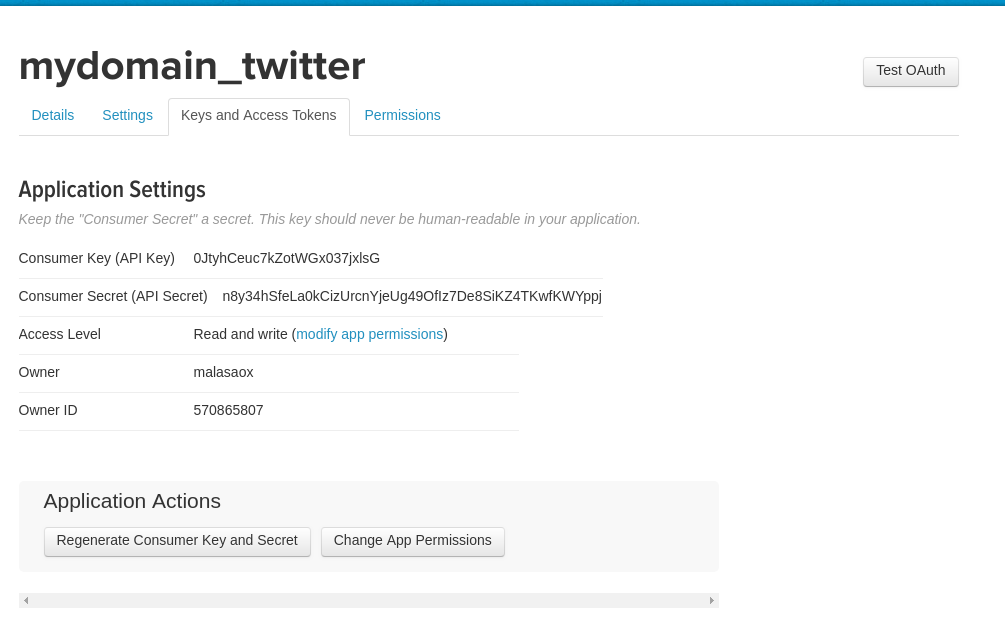
- In the following overview click "Keys and Access Tokens"
- Change in the "Permissions" tab "Read only" to "Read and Write" (should be default)
- Click "Update settings"
You can also update:
- Fill "Organization name" and "Organization website" if wanted
- Upload a custom application icon if wanted
Edit the file /opt/open-xchange/etc/twitteroauth.properties and insert the key and secret from the settings page above, like this:
com.openexchange.oauth.twitter.apiKey=0JtyhCeuc7kZotWGx037jxlsG
com.openexchange.oauth.twitter.apiSecret=n8y34hSfeLa0kCizUrcnYjeUg49OfIz7De8SiKZ4TKwfKWYppj
Install on OX App Suite
Debian GNU/Linux 11.0
Add the following entry to /etc/apt/sources.list.d/open-xchange.list if not already present:
deb https://software.open-xchange.com/products/appsuite/stable/backend/DebianBullseye/ /
# if you have a valid maintenance subscription, please uncomment the
# following and add the ldb account data to the url so that the most recent
# packages get installed
# deb https://[CUSTOMERID:PASSWORD]@software.open-xchange.com/products/appsuite/stable/backend/updates/DebianBullseye/ /
and run
$ apt-get update
$ apt-get install open-xchange-oauth open-xchange-messaging
Debian GNU/Linux 12.0
Add the following entry to /etc/apt/sources.list.d/open-xchange.list if not already present:
deb https://software.open-xchange.com/products/appsuite/stable/backend/DebianBookworm/ /
# if you have a valid maintenance subscription, please uncomment the
# following and add the ldb account data to the url so that the most recent
# packages get installed
# deb https://[CUSTOMERID:PASSWORD]@software.open-xchange.com/products/appsuite/stable/backend/updates/DebianBookworm/ /
and run
$ apt-get update
$ apt-get install open-xchange-oauth open-xchange-messaging
Install on OX AppSuite
Debian GNU/Linux 11.0
Add the following entry to /etc/apt/sources.list.d/open-xchange.list if not already present:
deb https://software.open-xchange.com/products/stable/DebianBullseye/ /
# if you have a valid maintenance subscription, please uncomment the
# following and add the ldb account data to the url so that the most recent
# packages get installed
# deb https://[CUSTOMERID:PASSWORD]@software.open-xchange.com/products/stable/updates/DebianBullseye/ /
and run
$ apt-get update
$ apt-get install open-xchange-oauth
Debian GNU/Linux 12.0
Add the following entry to /etc/apt/sources.list.d/open-xchange.list if not already present:
deb https://software.open-xchange.com/products/stable/DebianBookworm/ /
# if you have a valid maintenance subscription, please uncomment the
# following and add the ldb account data to the url so that the most recent
# packages get installed
# deb https://[CUSTOMERID:PASSWORD]@software.open-xchange.com/products/stable/updates/DebianBookworm/ /
and run
$ apt-get update
$ apt-get install open-xchange-oauth


