Caldav carddav Bundles: Difference between revisions
| Line 109: | Line 109: | ||
- In the "User name" field enter your username <br/> | - In the "User name" field enter your username <br/> | ||
- In the "Password" field enter your password<br/> | - In the "Password" field enter your password<br/> | ||
- In the "Server address" field enter your server address '''with the prefix "dav." and ":80" as suffix (e.g. "dav.MYSERVER.TLD: | - In the "Server address" field enter your server address '''with the prefix "dav." and ":443" or ":80" as suffix (e.g. "dav.MYSERVER.TLD:443")'''.<br/> Use '''443''' if you normally type '''https''' in your browser to reach your installation, '''80''' otherwise. <br /> | ||
- Click "Create"<br/> | - Click "Create"<br/> | ||
[[File:carddav-account5.png]] | [[File:carddav-account5.png]] | ||
Revision as of 06:17, 26 July 2011
Using CalDAV and CardDAV with Open-Xchange (Beta)
OXtender for Mac OS X will be discontinued due to the fact that the latest version of Apple OS X “Lion” will no longer support Apple SyncServices, which synchronization with OXtender for Mac OS X was based on. To support future synchronization between Open-Xchange Server and Mac OS X application, Open-Xchange implements synchronization functionality that will be using CalDAV and CardDAV protocols.
The new synchronization protocols are available for all customers with a valid Open-Xchange license of Open-Xchange Server Edition and Open- Xchange Hosting Edition.
Please note: As of today the Open-Xchange CalDAV and CardDAV support is „Beta“ and will be continuously enhanced. With this release only the native OS X applications are supported. The support for other clients e.g. Thunderbird is planned for a future releases. The CardDAV support only synchronizes one address book. Currently the global address book plus the user’s private address book will get merged into one address book on the OS X device.
Open-Xchange is eagerly interested in learning about your tests, specifically in your specific environment. Please provide us with your feedback via our Public Bugzilla OX6 Server Edition
Preparation
Please edit your file /etc/apache2/ox6.conf so that the existing configuration for ox as well as the new configuration for CalDAV and CardDav are placed inside a virtual host .
This is an example where MYSERVER.TLD is the domain-name of the ox-server:
$ vi /etc/apache2/ox6.conf
  NameVirtualHost *:80
  <VirtualHost *:80>
  ServerName dav.MYSERVER.TLD
   ErrorLog /tmp/dav.err.log
   TransferLog /tmp/dav.access.log
   <Proxy />
       Order allow,deny
       Allow from all
   </Proxy>
   ProxyPass / ajp://localhost:8009/servlet/dav/ smax=0 ttl=60 retry=5
  </VirtualHost>
  <VirtualHost *:80>
   ServerName MYSERVER.TLD
  <Location /ox6>
       # Expires (via ExpiresByType to override global settings)
       ExpiresByType image/gif "access plus 6 months"
       ExpiresByType image/png "access plus 6 months"
       ExpiresByType image/jpg "access plus 6 months"
       ExpiresByType image/jpeg "access plus 6 months"
       ExpiresByType text/css "access plus 6 months"
       ExpiresByType text/html "access plus 6 months"
       ExpiresByType text/xml "access plus 6 months"
       ExpiresByType text/javascript "access plus 6 months"
       ExpiresByType text/x-js "access plus 6 months"
       ExpiresByType application/x-javascript "access plus 6 months"
       ExpiresDefault "access plus 6 months"
       Header append Cache-Control "private"
       Header unset Last-Modified
       Header unset Vary
       # Strip version
       RewriteEngine On
       RewriteRule v=\w+/(.+) $1 [L]
       # Turn off ETag
       Header unset ETag
       FileETag None
  </Location>
  <Location /ox6/ox.html>
       ExpiresByType text/html "now"
       ExpiresDefault "now"
       Header unset Last-Modified
       Header set Cache-Control "no-store, no-cache, must-revalidate, post-check=0, pre-check=0"
       # Turn off ETag
       Header unset ETag
       FileETag None
  </Location>
  <Location /ox6/index.html>
       ExpiresByType text/html "now"
       ExpiresDefault "now"
       Header unset Last-Modified
       Header set Cache-Control "no-store, no-cache, must-revalidate, post-check=0, pre-check=0"
       # Turn off ETag
       Header unset ETag
       FileETag None
  </Location>
  <Location /ajax>
  SetOutputFilter DEFLATE
  </Location>
  </VirtualHost>
Install on OX AppSuite
Debian GNU/Linux 11.0
Add the following entry to /etc/apt/sources.list.d/open-xchange.list if not already present:
deb https://software.open-xchange.com/products/stable/DebianBullseye/ /
# if you have a valid maintenance subscription, please uncomment the
# following and add the ldb account data to the url so that the most recent
# packages get installed
# deb https://[CUSTOMERID:PASSWORD]@software.open-xchange.com/products/stable/updates/DebianBullseye/ /
and run
$ apt-get update
$ apt-get install open-xchange-caldav open-xchange-carddav open-xchange-webdav-acl open-xchange-webdav-directory
Debian GNU/Linux 12.0
Add the following entry to /etc/apt/sources.list.d/open-xchange.list if not already present:
deb https://software.open-xchange.com/products/stable/DebianBookworm/ /
# if you have a valid maintenance subscription, please uncomment the
# following and add the ldb account data to the url so that the most recent
# packages get installed
# deb https://[CUSTOMERID:PASSWORD]@software.open-xchange.com/products/stable/updates/DebianBookworm/ /
and run
$ apt-get update
$ apt-get install open-xchange-caldav open-xchange-carddav open-xchange-webdav-acl open-xchange-webdav-directory
Configuration
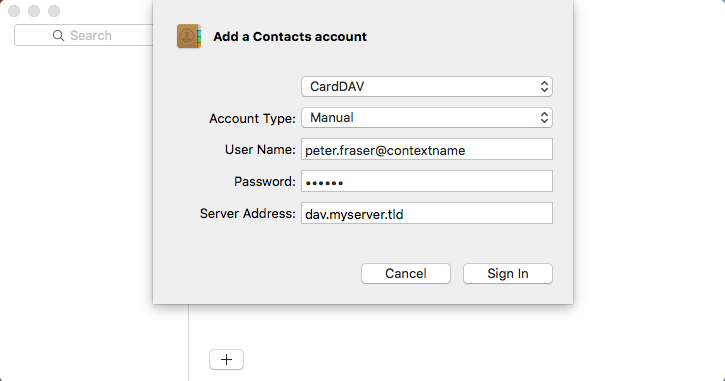
Mac OSX Address Book (for version 10.6 Snow Leopard)
- Click the "+" sign in Address Book -> Preferences -> Accounts.
- In the "Account type" field keep "CardDAV" selected
- In the "User name" field enter your username replacing "@" with "*" (e.g. enter "peter.fraser*CONTEXTNAME" if you normally log in to OX with the username "peter.fraser@CONTEXTNAME".)
- In the "Password" field enter your password
- In the "Server address" field enter your server address with the prefix "dav." and ":443" or ":80" as suffix (e.g. "dav.MYSERVER.TLD:443").
Use 443 if you normally type https in your browser to reach your installation, 80 otherwise.
- Click "Create"

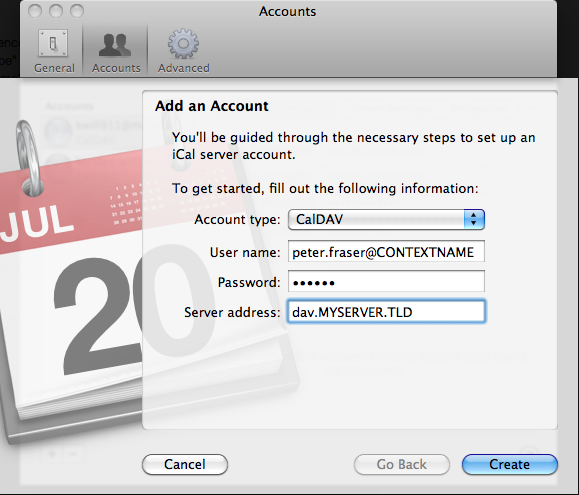
Mac OS X iCal (for version 10.6 Snow Leopard)
- Click the "+" sign in iCal -> Preferences -> Accounts
- As "Account type" select "CalDAV"
- In the "User name" field enter your username
- In the "Password" field enter your password
- In the "Server address" field enter your server address with the prefix "dav." (e.g. "dav.MYSERVER.TLD")
- Click "Create"
- Click "Continue"

Mac OSX Address Book (for version 10.7 Lion)
- Click the "+" sign in Address Book -> Preferences -> Accounts.
- In the "Account type" field keep "CardDAV" selected
- In the "User name" field enter your username
- In the "Password" field enter your password
- In the "Server address" field enter your server address with the prefix "dav." and ":443" or ":80" as suffix (e.g. "dav.MYSERVER.TLD:443").
Use 443 if you normally type https in your browser to reach your installation, 80 otherwise.
- Click "Create"

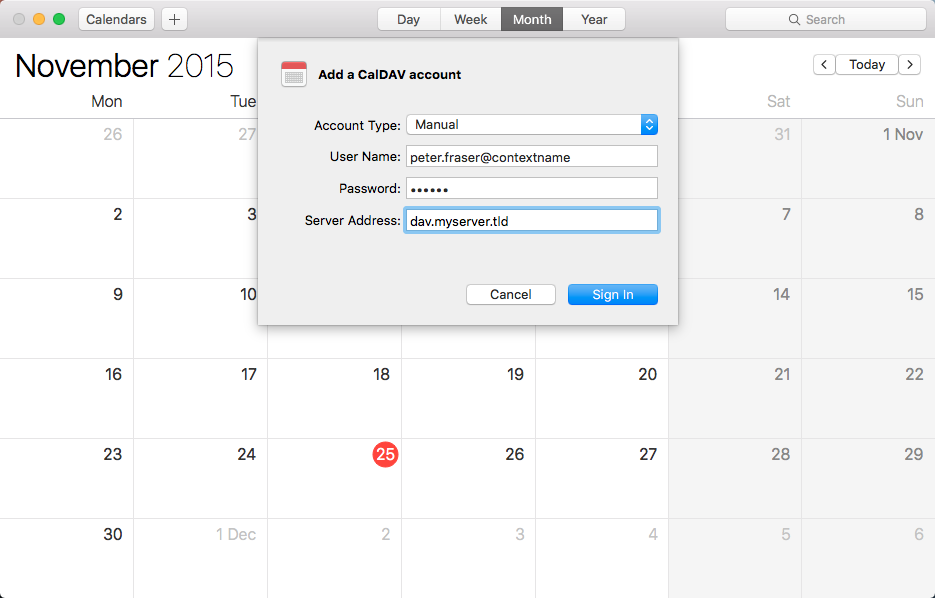
Mac OS X iCal (for version 10.7 Lion)
- Click the "+" sign in iCal -> Preferences -> Accounts
- As "Account type" select "CalDAV"
- In the "User name" field enter your username
- In the "Password" field enter your password
- In the "Server address" field enter your server address with the prefix "dav." and a slash as suffix (e.g. "dav.MYSERVER.TLD/")
- Click "Create"
- Click "Continue"
