AppSuite:Xing: Difference between revisions
Karsten.will (talk | contribs) |
(new xing workflow, new screenshot) |
||
| Line 8: | Line 8: | ||
* log in with a valid xing account. (Please note that upon entering production status the app and the personal account used to create it will be decoupled. So there is no need to use a company account here.) | * log in with a valid xing account. (Please note that upon entering production status the app and the personal account used to create it will be decoupled. So there is no need to use a company account here.) | ||
* click "+ Create App" in the upper right | * click "+ Create App" in the upper right | ||
* enter reasonable app and developer details | |||
=== 1 App details === | |||
* enter reasonable app and developer details | |||
* the app information (including logo) is what will be shown to the enduser when he decides whether to allow the app access to his xing-data | * the app information (including logo) is what will be shown to the enduser when he decides whether to allow the app access to his xing-data | ||
* set the domain of your App Suite server as "Callback domain" (e.g. "https://beta.ox.io/") | * set the domain of your App Suite server as "Callback domain" (e.g. "https://beta.ox.io/") | ||
| Line 22: | Line 23: | ||
* (This text is provided as an example for you to adapt or translate as required.) | * (This text is provided as an example for you to adapt or translate as required.) | ||
<br> | <br> | ||
=== 2 Access rights === | |||
* select access rights so they match those in this screenshot | * select access rights so they match those in this screenshot | ||
[[Image:xing- | [[Image:xing-screenshot2.png|400px|Screenshot 1, showing the rights to request]] | ||
* | === 3 User data === | ||
Select "Basic Data" | |||
=== 4 Developer Details === | |||
Enter your address where the production key should be send to. | |||
=== 5 OAuth === | |||
enter the URL of your server. | |||
* You should received an email from Xing after finishing the process. | |||
* The production key will be send by mail.(sent via _regular_ mail to the postal address given under "Company Profile". Please note that this may take up to a week.) | |||
* you will see 2 API-keys: "Consumer key" and "Consumer secret". | * you will see 2 API-keys: "Consumer key" and "Consumer secret". | ||
* enter those keys in /opt/open-xchange/etc/xingoauth.properties | * enter those keys in /opt/open-xchange/etc/xingoauth.properties | ||
| Line 31: | Line 45: | ||
* If your OX server is reachable by more than one host name, create or open the file "/opt/openexchange/etc/deferrer.properties" and set the properties therein as such: | * If your OX server is reachable by more than one host name, create or open the file "/opt/openexchange/etc/deferrer.properties" and set the properties therein as such: | ||
com.openexchange.http.deferrer.url=https://mymaindomain.invalid | com.openexchange.http.deferrer.url=https://mymaindomain.invalid | ||
Latest revision as of 08:09, 23 November 2015
Using Xing with OX App Suite
This page describes how to get an API-key needed for the XING integration features available starting with App Suite version 7.6.
Preparation
- go to https://dev.xing.com/login
- log in with a valid xing account. (Please note that upon entering production status the app and the personal account used to create it will be decoupled. So there is no need to use a company account here.)
- click "+ Create App" in the upper right
1 App details
- enter reasonable app and developer details
- the app information (including logo) is what will be shown to the enduser when he decides whether to allow the app access to his xing-data
- set the domain of your App Suite server as "Callback domain" (e.g. "https://beta.ox.io/")
- enter a text for "Description (English)":
Use this connector to synchronize your XING contacts with Open-Xchange App Suite, see the public XING-profile of people sending you email, synchronize your personal information with your XING-profile, see and write XING messages and connect via XING to your contacts from within Open-Xchange App Suite. For this we humbly require the access rights to your profile and connection information you see above.

The XING activity stream will be shown in a widget of the OX App Suite portal. With this widget you can also manually update your XING status.

You will be able to post updates from the OX App Suite portal that contain links.

The personal data of your XING-profile can be updated with your data in the OX App Suite addressbook with the press of one button whenever you want.
- (This text is provided as an example for you to adapt or translate as required.)
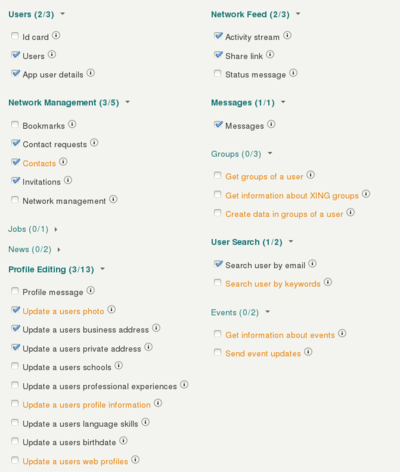
2 Access rights
- select access rights so they match those in this screenshot
3 User data
Select "Basic Data"
4 Developer Details
Enter your address where the production key should be send to.
5 OAuth
enter the URL of your server.
- You should received an email from Xing after finishing the process.
- The production key will be send by mail.(sent via _regular_ mail to the postal address given under "Company Profile". Please note that this may take up to a week.)
- you will see 2 API-keys: "Consumer key" and "Consumer secret".
- enter those keys in /opt/open-xchange/etc/xingoauth.properties
- If your OX server is reachable only via one host name, you won't have to do anything else.
- If your OX server is reachable by more than one host name, create or open the file "/opt/openexchange/etc/deferrer.properties" and set the properties therein as such:
com.openexchange.http.deferrer.url=https://mymaindomain.invalid
